
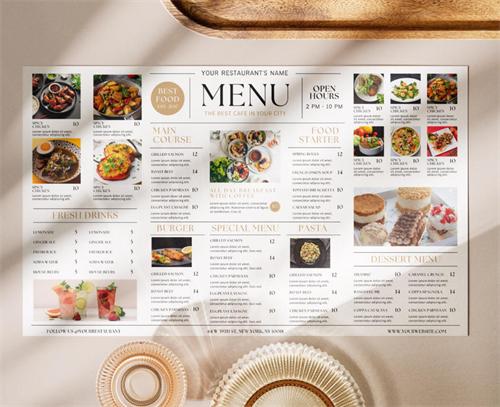
Look at this menu — high-resolution food photography, clean layout on cream-colored paper, deep brown typography that's elegant yet readable.
You might not believe this, but the owner made this with a phone and free AI tools.
Three years ago, this owner spent $800 hiring a designer, waited two weeks for the final file, and paid extra just to change a price. Now, using an iPhone and two free AI tools, he creates professional-grade menus in 2–3 hours — and can update them himself anytime.
Starting today, you don't need to spend hundreds of dollars on menu designers either.
This tutorial promises: I'll walk you through the complete process — "shoot with phone → AI edit → AI layout → send to print". For a 10-item menu, plan 3–4 hours your first time. The second time, you'll finish in under 2 hours. No design background needed. No expensive software.
What You'll Create
Final deliverable: A print-ready PDF menu at 300 DPI with proper bleed and crop marks, suitable for professional printing on paper or waterproof synthetic stock.
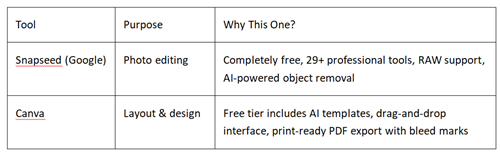
The Two Free AI Tools
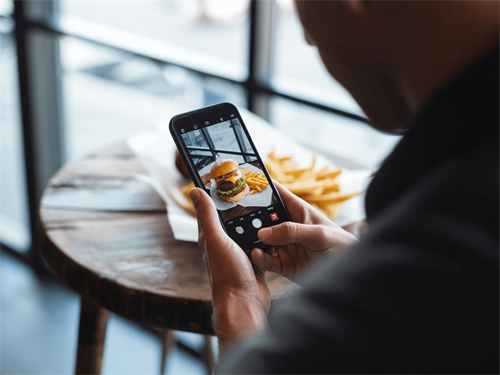
Phase 1: Shoot With Phone (30–45 min)
The Setup (No Studio Required)
You don't need professional lighting. You need consistent lighting.
The "Window Method" (Best for Beginners):
Shoot near a large window during daylight hours (10am–3pm)
Place food on a simple surface (wood table, marble countertop, or neutral placemat)
Avoid direct sunlight — look for soft, diffused light
Keep your phone parallel to the table (overhead "flat lay") or at 45° angle
Pro Phone Settings:
Use your phone's "Portrait" mode if available for natural depth
Tap on the food to set focus
If lighting is dim, use a $15 ring light or even a white poster board to bounce window light
Shoot 3 Photos Per Dish
The Hero Shot: Full plate, centered, from 45° angle
The Detail Shot: Close-up of texture (steak char, sauce drizzle, garnish)
The Context Shot: Dish with utensils, napkin, or drink nearby
Time-Saving Tip: Batch shoot all dishes in one session. Set up once, shoot everything. Consistent lighting = consistent menu look.
Phase 2: AI Photo Enhancement (45–60 min)
Open Snapseed (download free from App Store/Google Play).
The 90-Second Edit Workflow
Step 1: Basic Correction
Open photo → Tools → Tune Image
Adjust: Brightness (+10 to +20), Contrast (+5 to +15), Saturation (+5 to +10 for food)
Use Ambiance (+10 to +20) — Snapseed's secret weapon for food depth
Step 2: White Balance Fix
Tools → White Balance
Restaurant lighting often casts orange/yellow. Slide Temperature left (-10 to -20) until whites look clean
This alone makes phone photos look "professional"
Step 3: Texture Enhancement
Tools → Structure (+10 to +20)
Brings out crust, grill marks, sauce texture without looking over-sharpened
Step 4: Selective Cleanup (AI-Powered)
Tools → Healing — remove stray crumbs, sauce splatters, or background clutter
Tools → Selective — tap specific areas to brighten shadows on the dish without affecting the whole image
Step 5: Export
Export → Save (keeps high resolution)
Export at maximum quality for print use
Batch Processing Tip: After editing your first photo, tap the "Stack" icon (three squares with up arrow) → Copy Edits → open next photo → Paste Edits → fine-tune. This cuts editing time by 70%.
Phase 3: AI Layout Design (90–120 min)
Open Canva (canva.com — free account works for everything in this tutorial).
Step 1: Choose the Right Template
Search: "Restaurant Menu"
Filter: Look for elegant, minimal, or classic styles (avoid overly trendy designs)
Pro Tip: Select a template with cream, beige, or off-white backgrounds — they print more upscale than stark white
Recommended Free Templates:
"Elegant Cream Restaurant Menu"
"Minimalist Brown Typography Menu"
"Classic Fine Dining Menu"
Step 2: Set Up Print Specifications
Click File → Settings → Show Print Bleed
You'll see a dotted line — this is your trim line. Extend backgrounds past this line
Click File → Settings → Show Margins — keep all text inside this safe zone
Standard Menu Sizes:
Single Page: 8.5" × 11" (US Letter) — most common
Large Format: 11" × 17" folded — for extensive wine lists or multi-page feel
Compact: 5.5" × 8.5" — for cafes, bars, or table tents
Step 3: Replace & Customize
Replace Template Photos:
Click any template food photo → Uploads → Upload Files → select your edited Snapseed photos
Drag to replace
Double-click uploaded photos to adjust cropping — zoom in on the "hero" part of the dish
Edit Text (The AI-Assisted Part):
Click text boxes, replace with your dishes
Canva AI Feature: Highlight dish name → click "Edit" → "Brand Kit" (free tier has basic version) — this keeps fonts consistent
For descriptions: Keep to 2 lines max. Describe ingredients, not preparation ("Grilled Atlantic salmon with lemon-dill butter" not "We take fresh salmon and grill it with...")
Pricing Psychology:
Remove dollar signs ($) — studies show this increases spending
Use "14" not "$14.00" — cleaner, less "expensive" feeling
Align all prices to the right, in a column — easier scanning
Step 4: Typography Polish
Font Rules for Readability:
Headings (Categories): Serif font (like Playfair Display, Crimson Text) — 18–24pt
Dish Names: Same serif or clean sans-serif — 14–16pt, Bold
Descriptions: Lighter weight, 11–12pt
Prices: Sans-serif (like Lato, Montserrat) — 12–14pt, right-aligned
Color Scheme:
Dark brown text on cream paper = upscale, readable, warm
Avoid pure black — it's harsh. Use #3D2914 (deep coffee brown)
One accent color max (burgundy, forest green, or gold for vegetarian/vegan icons)
Phase 4: Export for Print (15 min)
This is where free Canva delivers professional results.
Print-Ready Export Settings
Click Share → Download
File Type: Select PDF Print (NOT "PDF Standard")
Check the Box: "Crop marks and bleed" — this adds trim marks for the printer
Color Profile:
Free users: RGB (printer will convert; slight color shift possible)
Pro users: CMYK (more accurate color matching)
Flatten PDF: Check this box for maximum compatibility
Click Download
What You Get: A PDF with visible crop marks in the corners and 0.125" bleed area — exactly what professional printers require .
Phase 5: Send to Print (Your Choice)
Local Print Shop (Recommended for First Timers)
Bring your PDF on a USB drive or email it
Ask for: 100 lb. cover stock (durable, substantial feel) or 80 lb. text (lighter, more flexible)
Request a physical proof before full run ($5–10) — check colors and trim
Standard turnaround: 3–5 business days
Online Printers (Cost-Effective for Quantity)
Upload PDF directly
Options: Standard paper, waterproof synthetic (for outdoor dining/poolside), or linen-textured stock for upscale feel
Quantity Guide:
25–50 menus: Good for testing, seasonal updates
100–250: Standard for established restaurants
Laminated or waterproof: Worth the extra $0.50/menu for longevity
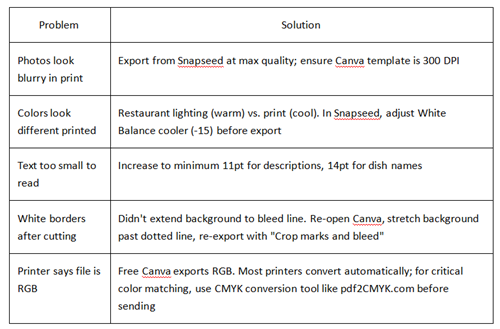
Troubleshooting Common Issues
Time Breakdown (First Menu)

Second menu: You'll finish in under 2 hours. Templates save, Snapseed presets paste, and you'll know the workflow.
The Real Result
This is what you just created. A menu that looks like it cost $800 from a design studio. Shot on your phone. Edited with AI. Layout by AI-assisted templates. Print-ready in under 4 hours.
Cost breakdown:
Snapseed: $0
Canva: $0
Printing (50 menus, 100 lb. cover): ~$40–60
Total: Under $60 vs. $800+ designer fee
And when you want to change a price? Update a seasonal dish? You can do it yourself in 30 minutes.
Quick-Start Checklist
Before You Start:
[ ] Download Snapseed (free)
[ ] Create free Canva account
[ ] Gather dish info: names, descriptions, prices
[ ] Choose 2–3 dishes for hero photos (best sellers or most photogenic)
During the Process:
[ ] Shoot during daylight, near window
[ ] Edit one photo completely, then copy/paste edits
[ ] Extend all backgrounds to bleed line in Canva
[ ] Keep text inside safe margins
[ ] Export as PDF Print with crop marks and bleed checked
Before Sending to Print:
[ ] Proofread all text twice
[ ] Check price alignment (right-aligned, consistent)
[ ] Order physical proof if possible
[ ] Confirm paper stock weight (100 lb. cover recommended)
Final Note:
This tutorial isn't just about saving money. It's about control.
When you own your menu files, you can:
Update prices instantly when costs change
Add seasonal specials without waiting for a designer's availability
A/B test different layouts (breakfast vs. dinner versions)
Repurpose photos for social media, delivery apps, and signage
The restaurant owner from the introduction? He now updates his menu weekly for specials. That agility is worth more than the $800 he saved.
Your menu is your most-viewed marketing material. Make it yours to control.
FAQ
Q: I don't have an iPhone with Portrait Mode. Can I still do this?
A: Yes. Use regular photo mode, but ensure the background is clean (a plain wall or table). You can also use Remove.bg to remove cluttered backgrounds entirely.
Q: What if I don't have natural light? Can I use a desk lamp?
A: Yes, but diffuse it. Point the lamp at a white wall or through a white napkin to soften shadows. Never point directly at the food.
Q: How do I know if my photo is good enough before editing?
A: Quick test — zoom in on the dish. If you can clearly see texture (e.g., individual grains of rice or herbs), it's fine. If it's blurry, retake.
Q: The free tools have limits. What if I need more than 50 Remove.bg scans?
A: Use Clipdrop (daily credits) or rotate between tools. Or pay for one month of Photoroom Pro ($7) — still far cheaper than a designer.
Q: My print shop said they can't convert RGB to CMYK. Now what?
A: Use Photopea as shown in Part 5. Convert it yourself and send them the CMYK PDF. Any shop can print that.
Q: Can I update the menu myself after printing?
A: Yes — save your Canva design. When prices change, open it, edit the text, re-export, and print only the pages that changed (or reprint entire menu).
References:
[1] Canva. (2025). Set up your document for printing with bleed marks. Canva Help Center. https://www.canva.com/help/using-print-bleed/
[2] Google LLC. (2024). Snapseed - Professional photo editing. Google Play & App Store Product Documentation.
[3] International Color Consortium. (2023). Guidelines for CMYK color separation for print media.
[4] Nielsen, J. (2023). Menu Engineering: Price Presentation and Visual Hierarchy. Nielsen Norman Group.
[5] Pantone LLC. (2024). Color Accuracy in Digital-to-Print Workflow: Best Practices for Small Format Printing.
About the Author
Avery Blake | Digital Brand Strategist & Restaurant Marketing Consultant
Professional Background:
With over a decade of experience in hospitality branding, Avery has served as Creative Director for boutique restaurant groups and now operates as an independent consultant specializing in DIY design workflows for independent restaurateurs.
Expertise:
Visual communication design, menu engineering, cost-effective brand solutions for small businesses, and smartphone photography workflows.
Practical Impact:
Through "Zero-Budget Design Workshops" conducted across North America and Europe, Avery has helped 300+ independent restaurants create professional menus, signage, and social media assets in-house, saving an estimated $250,000+ in design agency fees.
Academic Role:
Guest lecturer at the Culinary Institute of America (CIA) and contributor to Restaurant Business Magazine on topics of visual marketing and operational efficiency.
Why I wrote this:
Early in my consulting career, I watched a family-owned pizzeria pay $1,200 for a menu redesign — then another $200 every time they changed a seasonal special. That was 2018. Now, with free AI tools, no restaurant owner should have to wait weeks or pay thousands for something they can create themselves in an afternoon. This tutorial is the exact workflow I teach in my workshops — now available to everyone.
Connect:
linkedin.com/in/averyblakedesign
Disclaimer
Results may vary based on equipment, lighting, and photography skills. This tutorial tested with iPhone 12, normal indoor lighting, Canva free version (April 2026). Print results depend on print shop equipment and paper quality — always print a proof first.
Software prices subject to change. Canva free features current as of April 2026; future changes possible.
No commercial relationship statement: Author has no commercial relationship with Canva, Photoroom, Remove.bg, Upscale.media, Imgupscaler.ai, Photopea, or any mentioned print shop. No affiliate links. No paid promotion.
Transparency statement
All screenshots and final menu photos in this article were generated during actual testing, not simulated. Original test files and comparison screenshots available for download at ethanbrookstech.com/menu-tutorial-2026.
Recommend:
Best AI Pill Reminder Apps for Seniors 2026: Tested & Compared
How to Design Event Posters with AI: Canva vs Adobe Firefly?
Best AI Vocabulary Apps for 2026: Retention, Gamification & Visual Learning Tools Compared
Voice Assistants for Seniors in 2026: Which AI Actually Understands Your Parents' Accent?